![looking up at windowed skyscrapers and to the sky](https://edge.sitecorecloud.io/ironmountain-c8dd68e9/media/project/iron-mountain/iron-mountain/images/utility-and-support/looking-upward-at-blue-window-skyscrapers.jpg?h=550&iar=0&w=1920&sc_lang=en)
Securesync® information
![newuser3](https://edge.sitecorecloud.io/ironmountain-c8dd68e9/media/project/iron-mountain/iron-mountain/images/utility-and-support/how-it-works/secure-storage/securesync/newuser3.jpg?h=233&iar=0&w=500&sc_lang=en&mw=3840)
*This will be a temporary password to enable the user to login to SecureSync. The user will be prompted to create a new password upon a successful login.
![newuser4](https://edge.sitecorecloud.io/ironmountain-c8dd68e9/media/project/iron-mountain/iron-mountain/images/utility-and-support/how-it-works/secure-storage/securesync/newuser4.jpg?h=386&iar=0&w=500&sc_lang=en&mw=3840)
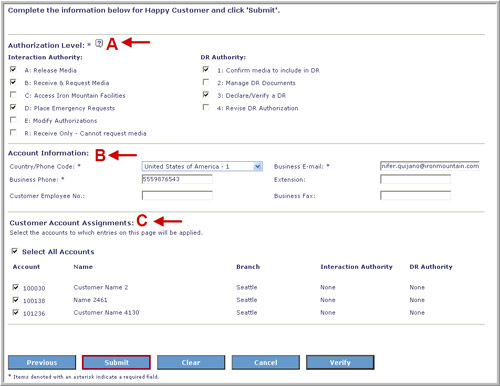
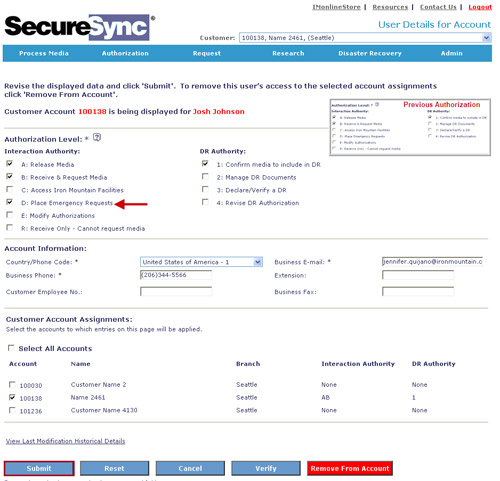
Step 4: Complete the following information:
A: Authorization Levels
- Interaction Authority, may be created by a user with E-level authorization.
- DR Authority, may be created by a user with DR4-level authorization.
B: Account Information
- The country code, business phone and email address must be entered.
C: Customer Account Assignments
- Select the account(s) to which the user will have access. You can select all or add individual accounts.Upon completion Select Submit.
![updateown2](https://edge.sitecorecloud.io/ironmountain-c8dd68e9/media/project/iron-mountain/iron-mountain/images/utility-and-support/how-it-works/secure-storage/securesync/updateown2.jpg?h=355&iar=0&w=384&sc_lang=en&mw=3840)
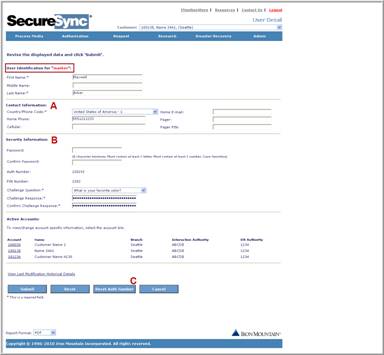
Step 2: These updated user details will be applied across all accounts:
- Contact information that applies to all accounts.
- Security information - SecureSync login password and challenge question and response.
- Reset Authorization Number - the ability to regenerate your authorization number. This will also modify the PIN number (first four digits of your authorization number).
Once completed, click Submit.
![removeuser5](https://edge.sitecorecloud.io/ironmountain-c8dd68e9/media/project/iron-mountain/iron-mountain/images/utility-and-support/how-it-works/secure-storage/securesync/removeuser5.jpg?h=497&iar=0&w=500&sc_lang=en&mw=3840)
![removeuser6](https://edge.sitecorecloud.io/ironmountain-c8dd68e9/media/project/iron-mountain/iron-mountain/images/utility-and-support/how-it-works/secure-storage/securesync/removeuser6.jpg?h=229&iar=0&w=500&sc_lang=en&mw=3840)
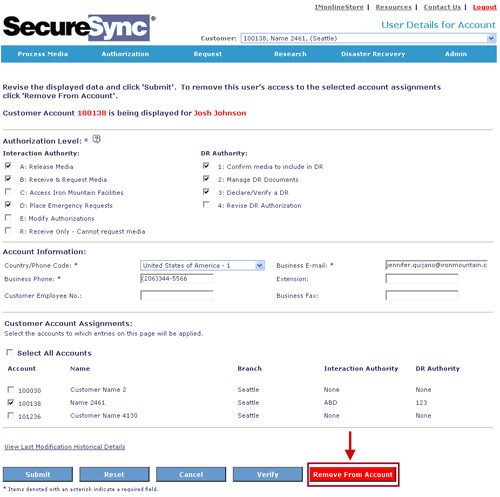
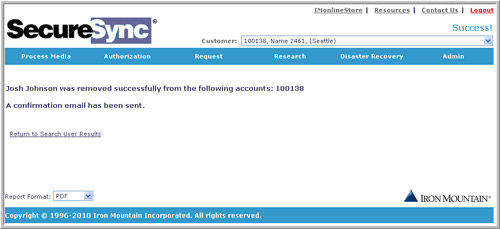
Step 6: The confirmation page shows that the user was successfully removed from the accounts(s).
![removeuser7](https://edge.sitecorecloud.io/ironmountain-c8dd68e9/media/project/iron-mountain/iron-mountain/images/utility-and-support/how-it-works/secure-storage/securesync/removeuser7.jpg?h=286&iar=0&w=500&sc_lang=en&mw=3840)
Step 7: A confirmation email will be sent to the requester. The impacted user will only receive a confirmation email if the requester was unable to completely remove the user from the account. The confirmation email will contain the updated authorization.
![userinteraction1](https://edge.sitecorecloud.io/ironmountain-c8dd68e9/media/project/iron-mountain/iron-mountain/images/utility-and-support/how-it-works/secure-storage/securesync/userinteraction1.jpg?h=229&iar=0&w=500&sc_lang=en&mw=3840)
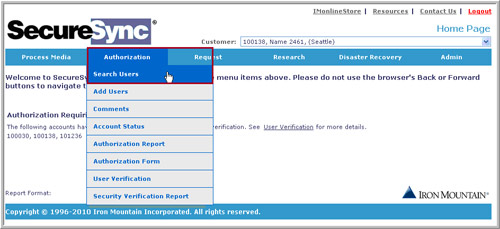
Step 1: From the main SecureSync menu select Authorization > Search Users.
![userinteraction2](https://edge.sitecorecloud.io/ironmountain-c8dd68e9/media/project/iron-mountain/iron-mountain/images/utility-and-support/how-it-works/secure-storage/securesync/userinteraction2.jpg?h=275&iar=0&w=500&sc_lang=en&mw=3840)
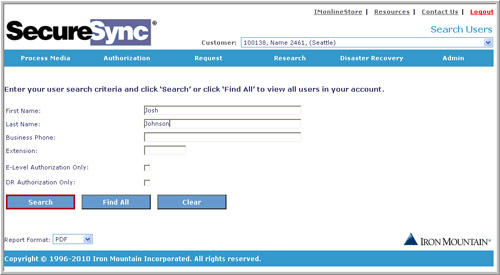
Step 2: Enter the search criteria and select Search.
![userinteraction3](https://edge.sitecorecloud.io/ironmountain-c8dd68e9/media/project/iron-mountain/iron-mountain/images/utility-and-support/how-it-works/secure-storage/securesync/userinteraction3.jpg?h=254&iar=0&w=500&sc_lang=en&mw=3840)
![userinteraction4](https://edge.sitecorecloud.io/ironmountain-c8dd68e9/media/project/iron-mountain/iron-mountain/images/utility-and-support/how-it-works/secure-storage/securesync/userinteraction4.jpg?h=369&iar=0&w=500&sc_lang=en&mw=3840)
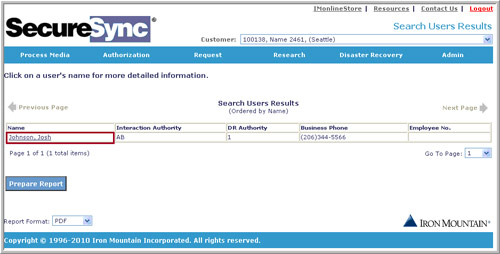
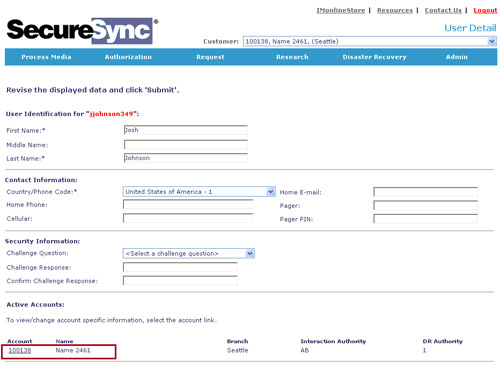
Step 4: Click on the Account hyperlink for the user. (You will be able to select “All Accounts” on the next screen.)
![userinteraction5](https://edge.sitecorecloud.io/ironmountain-c8dd68e9/media/project/iron-mountain/iron-mountain/images/utility-and-support/how-it-works/secure-storage/securesync/userinteraction5.jpg?h=481&iar=0&w=500&sc_lang=en&mw=3840)
![userinteraction6](https://edge.sitecorecloud.io/ironmountain-c8dd68e9/media/project/iron-mountain/iron-mountain/images/utility-and-support/how-it-works/secure-storage/securesync/userinteraction6.jpg?h=261&iar=0&w=500&sc_lang=en&mw=3840)
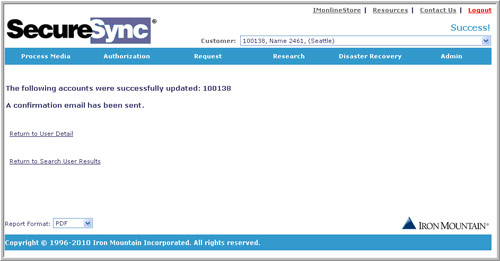
Step 6: The confirmation page shows that the user was successfully updated on the selected account(s).
![userinteraction7](https://edge.sitecorecloud.io/ironmountain-c8dd68e9/media/project/iron-mountain/iron-mountain/images/utility-and-support/how-it-works/secure-storage/securesync/userinteraction7.jpg?h=317&iar=0&w=500&sc_lang=en&mw=3840)
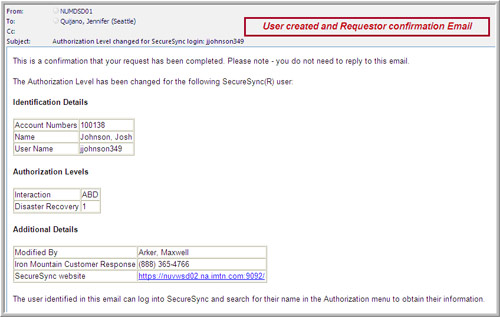
Step 7: A confirmation email will be sent to the requester and updated user.